Table Of Content

Be patient and understand that drawing hair is slow process. Take your time and allow the drawing to develop gradually. Below you'll see the finished portrait drawing from The Colored Pencil Course along with close ups of the marks used for stray hairs. From here, we can look for the relationships of values. Doing this may make the shapes of lighter and darker value stand out a bit more. 3) The hair drawing must convincingly represent the elements of light and shadow on form (such as the highlight, half-tone and shadow).
Recent Posts
'Hair Salon' Exhibition Showcases Architectural Potential of Black Hair - University of Houston
'Hair Salon' Exhibition Showcases Architectural Potential of Black Hair.
Posted: Fri, 27 Jan 2023 08:00:00 GMT [source]
Since this is a short hairstyle, keep them closer to the shape of the head, adding just slightly more volume to the outline of the skull. To portray thick or voluminous hair, use broad strokes to create a sense of fullness. Include individual hairs curling away from the main braid for a natural look, especially if the hair isn’t naturally straight or styled. After outlining the base structure of your braid by superimposing the primary shapes onto the ‘line of action’, your next move is to delve into the intricacies.
Step 6
This phase is all about enhancing and refining your drawing with minute details that bring the braid to life. Steer clear from straight lines and harsh angles as they could create an unnatural, rigid feel. “The key lies in avoiding excessively sharp and pointed lines. Unless the braid is exceedingly tight, it is likely to embody a round quality,” advises Larson.
Step 11
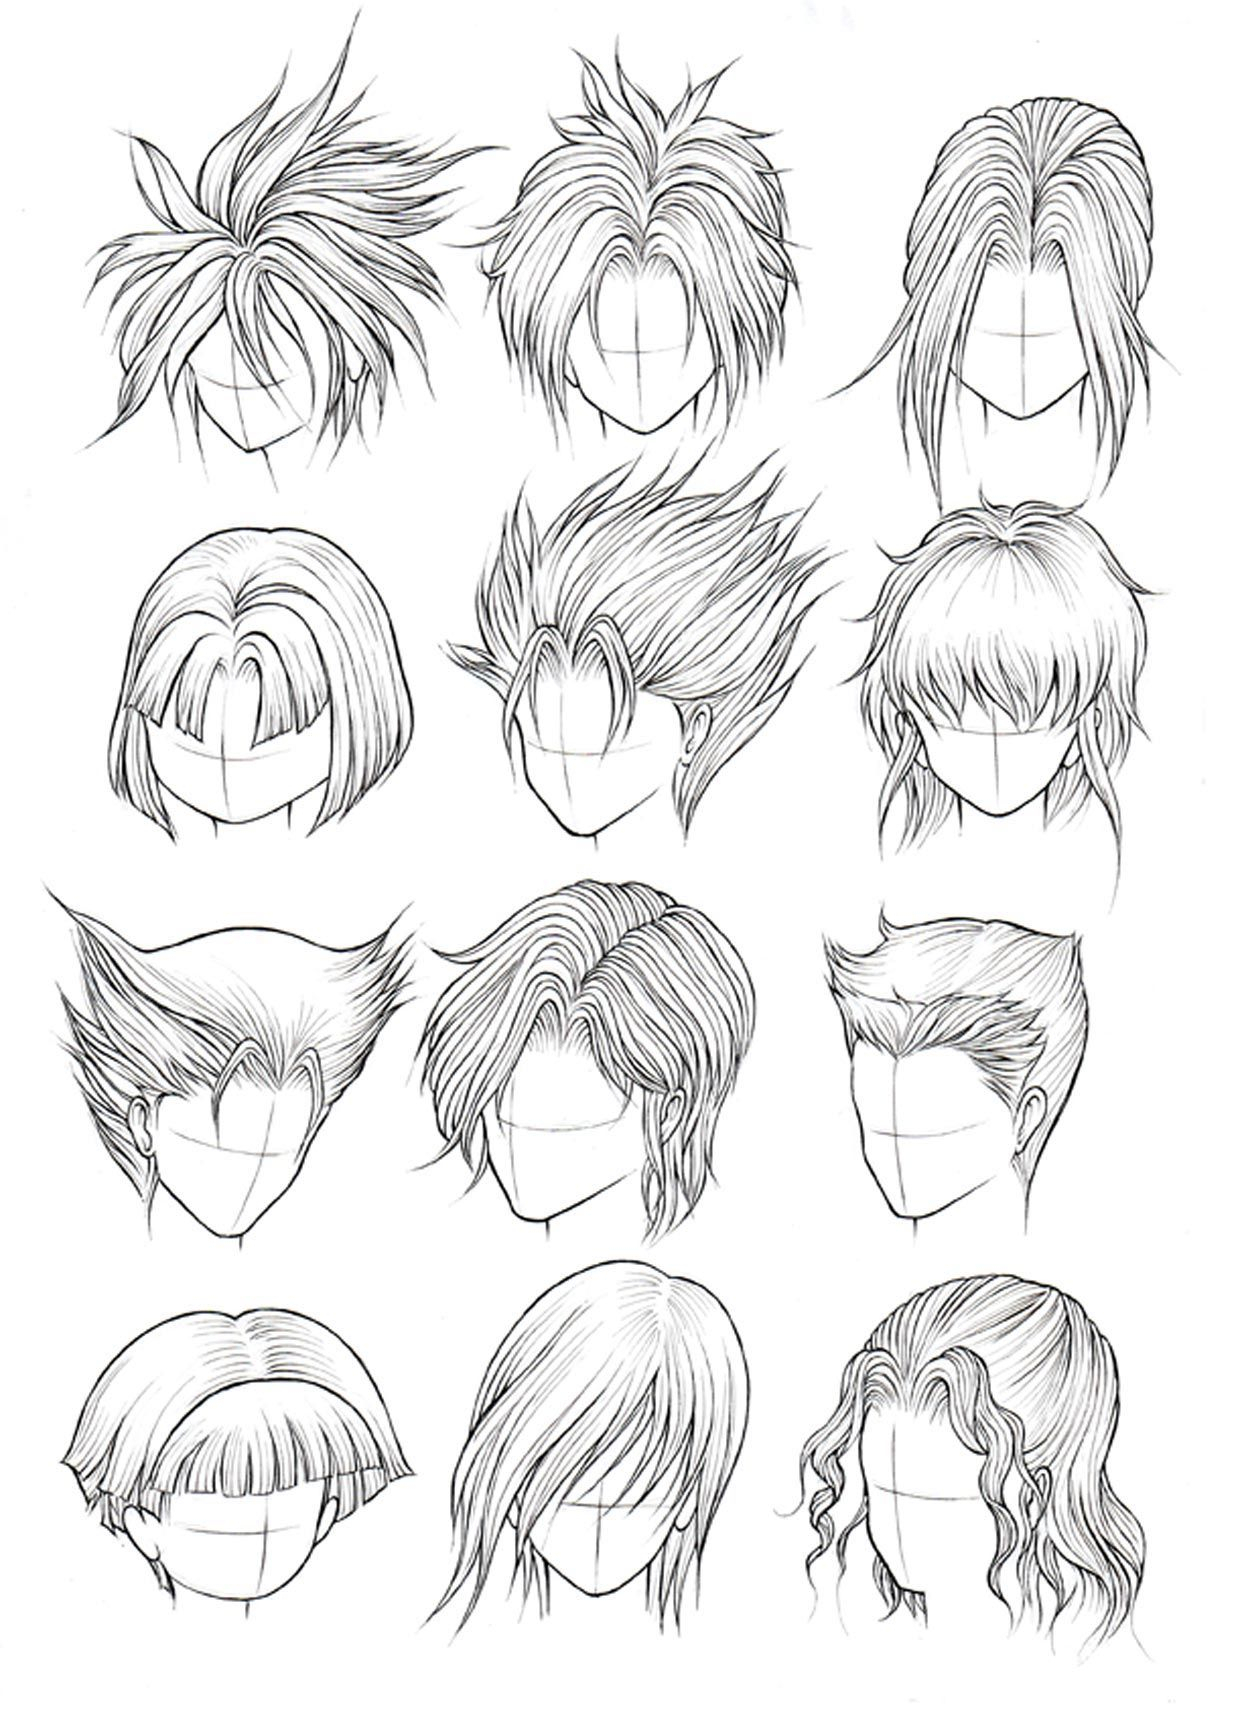
Hair strands naturally collect and create a form (which is what I am referring to as a "clump"). If the thought of drawing hair overwhelms you - you're not alone. It's easy to see all of the details and textures within hair and assume that it must be difficult to capture it all in a drawing. But it doesn't have to be overwhelming and we can simplify the process, making drawing hair a bit more manageable. Haircan be thought of as various forms depending on the hairstyle. Forexample, some curls can be thought of as cylinders, and can be renderedin much the same way.
As we develop the value range and create the illusion of form, we'll also consider the texture. If we keep these things in mind, then we can assume that (in most cases) the parts of the hair and the areas around the face will be darker in value since these areas recede. We also know that highlights are most likely to be found on the top of the head, closest to a light source above. We must consider the values and tones that are observed within the hair and include them in our drawing in order to communicate the volume of the hair.
Also try and keep your strokes somewhat visible (don’t blend them too much) to create an effect of individual hairs as you shade. Gradually add in the smaller folds and clumps of the hair to better define it’s shape. You can erase parts of the outline from the previous step where needed. The other styles have shortened instructions to avoid repetition. By carefully observing and manipulating negative space, you can create a sense of depth and realism in your hair drawings.

The artist states that if the hair isn’t wet, it should have volume. This tutorial shows you how to add volume to your hairstyles. Explore various manga female hairstyles with this reference sheet. The artist behind this sketch teaches others how to draw amazing manga art. After the general shape has been defined, we'll consider the light source.
Simplifying the Complex and Creating Flow
• My first step was to draw the outline of the main lock (the one which will be the base of our drawing), following the direction in a S shape. Hair is a very important point of expression for our characters, so drawing hair exactly as we imagine it can be a real challenge. I try to break it down and think three-dimensionally and consider the volume and shape of the hair form with drawing hair. The one I mentioned in the episode, from the romantic drama Love & Basketball, is sexy, yes.
Step 8
Notice the dark areas and the light areas in the hair. Instead, concentrate only on shapes and the value within them. Hair is soft, but there should be some indication of linear texture. To create the impression of linear texture, we'll apply the medium using directional strokes that flow over the form of each "clump" of hair. These lines are sometimes referred to as cross contour lines. After the harder and lighter pencil is applied, we'll progress to a darker and softer one - addressing the areas of darkest value and tone.
That's partly because they serve so many different functions, all of which look different, and all of which can be effective. The accessory sent the design world into quite the tizzy—but it also boasts deep roots in surrealism. This comprehensive guide is designed to accompany you throughout your journey, offering a blend of practical techniques, insightful tips, and step-by-step instructions. Regardless of your current skill set or experience level, this guide aims to inspire you to push your creative boundaries and craft stunning, lifelike braid illustrations. Alternatively, Shiela Larson, a distinguished artist, offers an exceptional approach of utilizing an alternating ‘Z’ shape as the baseline for her braid illustrations.
I have liked everything that I have read in the article so far. Yoai does it again with another fun and helpful tutorial. This one shows you how to draw four different types of curls. When you sketch, your drawing doesn’t have to be perfect. The purpose of your sketches is to get your ideas out quickly. Don’t worry about erasing or trying to ensure everything is just right.
The Sally Field blog is dedicated to highlighting all things beauty including makeup, fragrances, hair care, skin care and more with some lifestyle elements mixed in. Look for photographs, art books, magazines, or even online resources that feature a diverse range of hair styles. Start from the root and gradually work your way towards the tips, paying attention to the direction and flow of the strands.
The third and fourth steps are combined and are executed at the same time. Before we begin the process of drawing the hair, we need to be sure that the structure of the head is drawn in place. The structure of the head dictates the shape and flow of the hair and should be defined before we begin drawing the hair. Remember, every head of hair is unique, so your drawing techniques should vary to match the distinct characteristics of each hair type. For example, consider the texture, volume, color, and style differences when drawing braids on people of various ethnicities. Textured braids on a Black person, like cornrows or box braids, will differ from those on a person with smoother hair due to their unique styling and texture.